Black Point
Setting the Black Point (Shadow)Target Values
When you set the Black Point Target values you are adjusting the image's tonal range to match the capabilities of the printer and media combination you are using. You will then select the part of the image you want to be the black point. This will be the area that has the first discernible difference from the maximum black present in the image. Due to the possible presence of reflected color in shadow areas, we will perform this step in the Luminosity Mode. Luminosity mode acts in the lightness channel of the L*a*b* color space. Setting the Black Point in this mode changes the value, but leaves the general color relationship the same. If you are sure your chosen black point in the image is neutral, it is better to perform this step in the Normal mode, however if it is not neutral, it is worse.
Luminosity Mode
Go Layer, New Adjustment Layer, Curves. Make sure the Mode is set to Luminosity.

Set the Mode to Luminosity for the Black Point
Setting the Black Point Target Values

Double click the Black Point Eyedropper (shadow target) Tool in the Curves Dialog Box.
This will bring up the Color Picker. You will actually be setting the black point target values in this case, not selecting a foreground or background color.
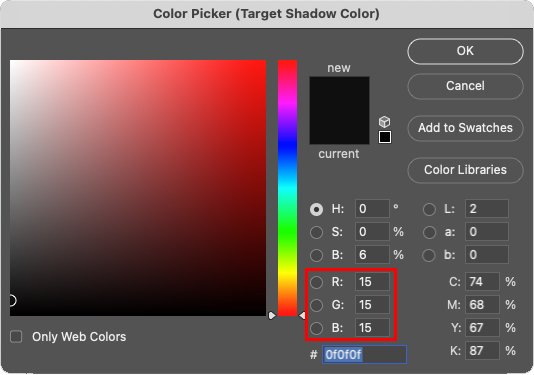
Double click on the Black Point Eyedropper in the Curves Dialog Box and the set the RGB values for the Black Point
Setting Black Point RGB Values
Enter the appropriate RGB values for the printer/media combination you are using. To determine the appropriate settings utilize the Tone System Black Point Targets. Visually check to determine where you want the black point to appear. If you have not tested the Black Point parameters of your printer/media combination, you can use R15, G15, B15 as a general starting point for a high quality ink-jet printer.
NOTE: If you are preparing images for a website or online use, you may want to set the Black Point RGB values at R5, G5, B5 or R10, G 10, B10. Since monitors are viewed as transmitted light (instead of reflected light as a print would be), they can typically display a wider range of values. Images edited for inkjet output Black Point parameters can look low in contrast when viewed on a monitor. Don’t let this disturb you when you are processing images for high-quality inkjet printing. Though an image processed using the Tone System may look a bit low in contrast on your monitor, it will look good in print form.
On the next page we will set the Black Point in the image.
Next Page • Page 1 • Page 2 • Page 3 • Black Point • Six Steps of CC